An interesting repair...with all the twists and turns

An interesting repair...with all the twists and turns

Investor · Fort Lauderdale, FL · Member since 2012 · 1k+ posts · 465 votes

I am an engineer by trade and sometimes out of curiosity, I look where I shouldn't have, and this had in the past lead me to some big headaches.

So I have this condo vacant and went around and did a bunch of repairs and I left the last item alone because I hated hated doing it. Which is to fix a slow draining bathtub. I knew I would be pulling other's hair balls out of the drain and it's the #1 thing I absolutely hate. I left it as my favorite last thing to do.

While I removed the bath drain and cleaned it, I decided that it's a good time to change it to a lift and turn style instead of the pop up linkage. The hardest part would be if the old drain wouldn't unthread from the shoe below due to corrosion but I was able to get it out without too much elbow grease. A trip to a nearby plumbing supply, a new lift and turn, some putty, done in 15 minutes.

Now, the lever of the old linkage is still on the overflow. I thought about just leaving that alone, but didn't want to have the next tenant tell me the lever "doesn't work", so I decided to change it to a plain overflow cover. BIG MISTAKE? LOL.

I removed the two screws holding the overflow cover plate, and as I did that and removed the cover I saw the overflow pipe behind the tub literally fell off. FELL OFF, as in disappearing into the wall cavity! So what do you do in this case? Laugh or cry?

I need to somehow get access to the tub drain tee behind the tub. But I don't see a clear solution. Here is a picture.

The tub is on the right. As you can see, no way to access from the front, as it's all tiled.

Can't access from the left even if I pull the toilet and cut the drywall, there would be at least a stud or two in the way. No access from the right either, as on the other side of the right wall is the kitchen and cabinets. No access from the wall behind it as that is another owner and property is vacant in foreclosure.

I toyed with the idea of pulling the toilet and cutting a hole in the front apron of that fiberglass tub, but really didn't want to do that.

Finally, I bit the bullet and went into the kitchen, opened the kitchen sink cabinet, and cut a hole on it's side, and pray that would give me access to behind the tub, and I would be able to reach it and be able to do what I need to do with one hand.

After some wearing and cursing by wedging myself like a pretzel inside the kitchen cabinet, I managed to cut a hole, and it appears I can see the back of the tub.

So first thing I noticed is my neighbor has the same layout, only in mirror image.

I retrived the overflow pipe laying inside the wall, and looked.

Turned out whoever the plumber was who plumbed the tub, he was nice enough to cut the overflow pipe so that it inserts only 1/8" of an inch into the top of the tee. See the dark ring at the bottom of the tee in the picture below? That's how far it went into the tee, and if anyone does any finessing of the overflow cover, it would pull off.

So, no big deal, I took some measurements and put in a new overflow, this time, FULLY SEATED into the tee. A bit tricky to do since I can reach my hand in there, but can't see at the same time.

Now that I am done with my end, I turned my attention to my neighbor's. As you can see, he/she has three problems. First, that overflow pipe may be short like mine; Second, the overflow pipe was not property seated on the back of the tub, so it leaked; Third, those leaks have corroded the back of the cast iron tub, and lastly, once I opened the wall cavity, I can smell a bit of sewer gas. I am pretty sure due to that property being in foreclosure and vacant, the traps are probably dry and gas has been entering that unit, and seeping into the wall cavities where it's not sealed. I made a mental note to find whoever is maintaining or representing the property and have a conversation.

So now all I have to do is to test and make sure the pipes are properly connected and no leaks. I turned on the tub spout and filled the tub to the overflow hole and let it drain. No problem. I see no leaks from the PVC connections.

BUT...there is a leak somewhere. Somehow the bottom plate is getting wet and I am getting a drip from above - slowly. Oh oh.

I can't see up from that hole I cut in the kitchen cabinet. I can't fix what I can't see. I don't even know what's leaking. I can only see where it's dripping on the bottom plate.

I am back on the same boat. I need to get access to what's behind that wall and higher up, and I knew I just opened a can of worms. I have to get creative or bring a sludge hammer.

So I went to a bar and had a few beers. More to follow.
0Reply
28 views

Most Popular Reply

Roy N.Pro Member
Rental Property Investor · Fredericton, New Brunswick · Member since 2013 · 7k+ posts · 4k+ votes
12y

Sam:

If you remove the handle and backing plate, you may be able to access the mixer though the front of the tub w/o having to cut additional holes.

If you do need to go into the wall ... if the kitchen side is just sheet rock, it would be easier to unmount any upper cabinets and to in through that wall.

See this reply in the discussion

22 Replies

Jump to latestLatest
  • Roy N.Pro Member
    Rental Property Investor · Fredericton, New Brunswick · Member since 2013 · 7k+ posts · 4k+ votes
    12y

    @Sam Leon

    Aside from the leak (check the mixer), the first thing I noticed is there is no fire (or sound) separation between you and your neighbour.

  • Investor · Fort Lauderdale, FL · Member since 2012 · 1k+ posts · 465 votes
    12y

    After I went back I decided that the first order of business is to systematically test and find out what's leaking.

    Since it is close to that hole I cut, and leaked when I filled the tub to test the overflow pipe connection, then it has to be the bathtub valve, the overhead shower, the tub spout, or the cold or hot copper supply lines leading to them.

    So first I did was I removed the tub spout and the shower arm and examined the connection. Seems OK. I then capped them and turned on the valve. Hot only, cold only, divert to the spout, divert to the overhead shower. No leak.

    Strange, but actually good news, because if it's under pressure but not leaking, then the leak is somewhere else, possibly the shower arm connection or the spout connections were loose, and water seeped back behind the wall and traveled along pipes.

    I reconnected the shower arm and spout. This time cleaned the threads really well, used joint compound and sealed the holes around the protruding arms with silicon. Tested, no leak. Good, but wait, leaked again. Ay ya ya, intermittent leaks.

    I took everything apart again, and retested everything, capped A, turn B on, capped B, turned A on, hot only, cold only, combination...no leak. Put them all back, tested again, no leak. Puzzled, I decided to leave shower running for 30 minutes and wait. Checked and no leak, but after a few minutes, drip drip drip very slowly.

    This made absolutely no sense. Everything was systematically tested and inconclusive. I tested everything that can be tested without breaking walls.

    I decided I might have to open the wall behind the tub after all, and the next day I went around hunting for matching tiles with no luck.

    I end up at that same bar and had a few more beers. I also started to read the HOA governing docs and by laws. More to follow.

  • Investor · Fort Lauderdale, FL · Member since 2012 · 1k+ posts · 465 votes
    12y
    Originally posted by @Roy N.:
    @Sam Leon

    Aside from the leak (check the mixer), the first thing I noticed is there is no fire (or sound) separation between you and your neighbour.

    Roy, I did check the mixer. That's not the problem. It's now resolved and I am just documenting my journey because it's so crazy.

  • Roy N.Pro Member
    Rental Property Investor · Fredericton, New Brunswick · Member since 2013 · 7k+ posts · 4k+ votes
    12y

    Sam:

    If you remove the handle and backing plate, you may be able to access the mixer though the front of the tub w/o having to cut additional holes.

    If you do need to go into the wall ... if the kitchen side is just sheet rock, it would be easier to unmount any upper cabinets and to in through that wall.

  • Investor · Fort Lauderdale, FL · Member since 2012 · 1k+ posts · 465 votes
    12y

    As I was contemplating my next move, and really hating that I may have to open up that tiled wall, and really not being able to see what is causing the leak was driving me nuts.

    I decided to retest a third time, this time wait till it leaks and drips, then look at all the connections to the valve mixer, the shower arm, and the spout. They are dry. Yet the drips are coming from above, where these connections are.

    Finally, I decided to squeeze myself into the cabinet and reach up with my hand as far as I can go on the other side, and feel around by touch. I can feel two larger pipes (besides the supply lines to the two units) going horizontally. Hmmm those are drains. Two of them in parallel. I felt the hot and cold supplies, I felt the tub spout stubout etc...dry. But back to the drains, and it's a bit wet. The drains are wet. It then dawn on me, it's the kitchen drain from my own kitchen sink that's sitting in the same cabinet I am squeezed into. There are two of them running parallel because my drain and my neighbor's drain are mirror image. Why would that be wet under? Well because I just washed my hand in the kitchen sink.

    I couldn't stop laughing...it was leaking because I just turned on the kitchen faucet. May have NOTHING whatsoever to do with the bath an shower. It's intermittent because I was using that sink once in a while to rinse my hand whenever I reached inside the hole with a flash light. I did a few other tests and confirmed it's the kitchen drain but right where it crossed under the shower where the tub spout protrudes out of the wall, it was touching the drain from above, and that pipe when water's on, vibrates against the drain and encouraged a slow drip, but the drip happens even if I just turn the kitchen faucet on.

    Now I need to device a plan to fix the leaking drain line, which is 1-1/2" copper, not PVC. I can't even see it, I know it's there, I don't want to open up the tile wall.

    I took a camera, and reached in with my hand and point the camera up, I can't see anything with me inside the kitchen, but I can snap pictures with my hand in the wall cavity. So I took about two dozens of pictures with flash on, and that night I loaded them onto my desktop and zoomed around and looked.

    I feel like a CIA analyst on a recon mission looking for WMD LOL. But after a bit I spotted something.

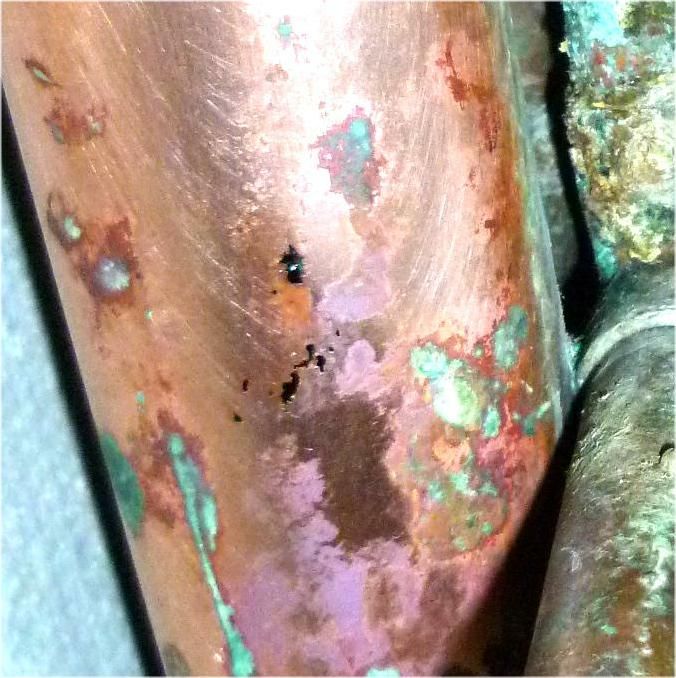
    See the water on the underside of the pipe?

    So the next day, sort of knowing where to look, I point my camera to that spot and took some more pics, and one of them showed me what I needed to see.

    Zooming in...

    So...on the bottom side, several (that I can see), I know I am looking at a pipe at the end of it's life, and I cursed whoever made DRAINO, out loud. More to follow, haha.

  • Investor · Fort Lauderdale, FL · Member since 2012 · 1k+ posts · 465 votes
    12y

    So now that I know what the problem is, I have to figure out how to solve it.

    The pipe is not going to last too long. Further, my neighbor's pipe is in the same shape. I would prefer to replace that whole pipe, which runs from the kitchen all the way behind the tub, behind the toilet, to where the lav cabinet is (the vent stack protudes the wall) there.

    Since my pipe and my neighbor's pipe runs in parallel like a shot gun towards the stack (which is cast iron), and I know my lav sink and my neighbors also run in the other direction to the stack, also in a shot gun formation, that tells me there will be a problem because we are dealing with a very specialized fitting that takes a twin pipe from the same direction, and most likely there are two of them, one over the other. The copper threaded connection to that is mostly likely corroded and have to be peeled out. Besides, whoever remodeled the place last did not hire a good plumber, who put in a disposer when the wall studout is too high for it. So if I want to solve this once and for all, I need to open that whole wall up all the way across, and really lower the kitchen drain to accommodate a deep sink with a disposer, and the current connections at the stack means I can't do all that, not legally anyways.

    So I went back to the HOA documents, and guess what, it says the HOA is responsible to fix anything in common walls. I know the HOA doesn't have a lot of money, because the foreclosed unit hasn't been paying, and this is a small building, only 4 units. They are going to have a problem paying for my pipe replacement, and retile and all that work, and the connection at the stack had me worried. It may have to be left alone and I just no hub the new PVC pipe in. I decided I need to figure out who's in charge next door, fixing my pipe and not fixing my neighbor's soon to fail pipe makes no sense, and I need to get a handle on the sewer gas from their traps anyways.

    After talking to a few people, ex-agents, I found out the property is under contract with a new owner, but the bank is slow and it's some sort of probate issue. Long story short I got a hold of the person who's under contract to buy and patiently waiting, he gave me the name of the agent I explained the problem and they met me at the property and let me into the vacant property.

    That place stunk. Sewer gas. I turned on all the faucets, flushed toilets, opened windows. Then I explained to them the problem...and showed the new "soon to be owner" the pictures of his tub and the pipes, convinced that he needs to replace his tub and redo his bathroom. He says he expects the bank to close in December or January. So I told him when he redo his bathroom and opens up that wall, I will come in and replace both drains at the same time, and possibly lower his kitchen drain connection so it can properly accommodate a disposer.

    So he does his bathroom remodel, replaced the tub, replace his tiles.

    I fix his and my kitchen drains, lower the connections, at minimum cost.

    I already talked to the HOA, and they are OK with me doing it, since it saves them money, compare to the alternative.

    win-win-win.

    So I have a long term solution - as long as he will be the buyer and not back out. haha.

    Now, I still need a temp fix for this leak.

    I used a sandpaper to sand down that spot and had a better picture taken by a camera.

    Zooming in...

    ]\

    Definitely corrosion, most likely Draino.

    That pipe is falling apart, but is this the only spot for now, or there are other holes up or downstream?

    So I patched the holes there with none other than duct tape, and turned on the kitchen faucet. No leak. That proves no other leak besides those. That makes it easier. Now I just need a temporary solution.

    There is no way I can cut that section out. I can't see it, too tight for any tools to squeeze in, it has other pipes running along, across, on top so even sanding was a challenge.

    Whatever I do has to be done without seeing. I have to do it, and confirm I did it at the right location after by taking a picture and looking at the picture.

    I end up using some epoxy plumber's putty, didn't really like this stuff but for a drain, not pressurized, and knowing I can implement a permanent fix in a few months, what the heck.

    So no leak for now.

    Imagine, going through all that because I wanted to open the overflow cover to remove the old drain linkage.

    Was it bad luck?

    or good luck because I fixed what could be a major issue, and I met the new soon to be neighbor.

    I had a few beers along the way.

  • Investor · Fort Lauderdale, FL · Member since 2012 · 1k+ posts · 465 votes
    12y
    Originally posted by @Roy N.:
    Sam:

    If you remove the handle and backing plate, you may be able to access the mixer though the front of the tub w/o having to cut additional holes.

    If you do need to go into the wall ... if the kitchen side is just sheet rock, it would be easier to unmount any upper cabinets and to in through that wall.

    Roy, I did take the trim plate off to see. I wanted to make sure the four connections to it, two in, two out, and they are all dry, so I know it's not the pipes it connected to.

    If the leaks were higher up, the wall cabinets is one option.

    If is lower where the counter top is. A tough spot. I finally was able to patch it from the underside blind.

    If I weren't able to do that, or if I can't locate the new buyer, my last resort would have been to tell the HOA they need to fix this, and have them tear my wall apart.

  • Investor · Fort Lauderdale, FL · Member since 2012 · 1k+ posts · 465 votes
    12y

    Sorry it's so long and wordy...I thought it's an interesting case and a bit "out there".

    Now, my kitchen cabinet has a permanent access panel.

  • Real Estate Professional · West Palm Beach, FL · Member since 2012 · 23k+ posts · 13k+ votes
    12y

    Sam, great journey, thanks for sharing. Sometimes you think you're better off not knowing, but ignorance is Not bliss......stitch in time, and all that. And of course , as an engineer, you had to put a handle on the cover....love it!

  • Investor · Atlanta, GA · Member since 2013 · 3k+ posts · 3k+ votes
    12y

    Better you than me......that's all I can say ;-)

  • Investor · Southeast, MI · Member since 2012 · 2k+ posts · 1k+ votes
    12y

    I thought they don't use copper in Florida because of issue with not holding up to the humidity?

  • Investor · San Jose, CA · Member since 2011 · 355 posts · 90 votes
    12y

    @Sam Leon , my understanding is that Drano does not harm pipes, whether copper or otherwise. Sometimes though there seems to be a correlation because Drano often gets used when there is already a lot of wear-and-tear on the pipes and they are already quite thin.

    Some clog-removers are acidic and react with copper, but not Drano.

  • Investor · Fort Lauderdale, FL · Member since 2012 · 1k+ posts · 465 votes
    12y
    Originally posted by @Rob K.:
    I thought they don't use copper in Florida because of issue with not holding up to the humidity?

    Every home I have owned have copper supplies, some have copper drains some cast iron. Of course I tend to buy the older homes that were built in the 50s, 60s and 70s.

    Since we don't have basements, the old homes have soft copper under the slab, continuous no joints from manifold to manifold. Many are still holding up after 40, 50 years.

  • Investor · Fort Lauderdale, FL · Member since 2012 · 1k+ posts · 465 votes
    12y
    Originally posted by @Michael D.:
    @Sam Leon , my understanding is that Drano does not harm pipes, whether copper or otherwise. Sometimes though there seems to be a correlation because Drano often gets used when there is already a lot of wear-and-tear on the pipes and they are already quite thin.

    Some clog-removers are acidic and react with copper, but not Drano.

    Michael,

    This has been an ongoing debate for a long time.

    Many plumbers in the field will tell you Draino is the #1 killer of old copper drains. No proof though.

    Some insist Draino causes corrosion.

    Some insist Draino doesn't but once the corrosion started for whatever reason, Draino makes it much worse.

    Some other insist Draino is OK but not if it sits in your drain for a while, such as a case where you have a piece of whatever on the bottom of the pipe and puddle the Draino you poured down.

    Yet some other things Draino is getting a bad rep because many think "Draino" automatically when referring to any drain cleaning products.

    What makes it even more confusing is Draino themselves have changed formulas several times over the years.

    What I would say is last time I checked, Draino's PH value is between 12 and 14.

    Also down here, if you hire a plumber to clear a kitchen drain, many of them are trained to ask the customer if they poured Draino down before calling them...because if they take the p-trap under the sink apart, and there's Draino there, they are in for a nasty burn. So many old timer plumbers hate Draino.

    I myself would never use it. I have use Bio-Clean and that works.

  • Investor · Fort Lauderdale, FL · Member since 2012 · 1k+ posts · 465 votes
    12y
    Originally posted by @Wayne Brooks:
    Sam, great journey, thanks for sharing. Sometimes you think you're better off not knowing, but ignorance is Not bliss......stitch in time, and all that. And of course , as an engineer, you had to put a handle on the cover....love it!

    Hey, that's a luxury access panel, the brushed nickel solid handle makes it worth $30 more rent.

  • Real Estate Investor · Audubon, PA · Member since 2009 · 13k+ posts · 8k+ votes
    12y

    @Sam Leon - check around for a plumbing outfit in your area that does drain re-lining. That basically would be done by sending a fabric tube into the pipe and then injecting an epoxy/resin that will cure in place. Might be just the cure for you in this little mess you have. Next link might find one for you:

    https://www.google.com/search?q=drain+reline+"fort+lauderdale"

  • Real Estate Investor · Kirkland, WA · Member since 2012 · 480 posts · 116 votes
    12y

    @Sam Leon , thanks for taking all the time to log your experience here on BP. I'm glad I'm not the only one with hairy problems like this! Glad you finally got it figured out.

  • Jose RubioPro Member
    Investor · Groveland, FL · Member since 2013 · 38 posts · 6 votes
    12y

    I must say @Sam Leon , that was both entertaining and educational. Looking forward to your next adventure.

  • Real Estate Agent · Milwaukee County, WI · Member since 2009 · 3k+ posts · 525 votes
    12y

    Thank you for providing the pics

  • Investor · Fort Lauderdale, FL · Member since 2012 · 1k+ posts · 465 votes
    12y
    Originally posted by @Ramon Jenkins:
    Thank you for providing the pics

    Hahaha I have many pics. I must have taken a few dozens when I tried to find the leak.

    Next time when a contractor tells me "you can't fix what you can't see" I am going to show him.

  • Investor · Fort Lauderdale, FL · Member since 2012 · 1k+ posts · 465 votes
    12y
    Originally posted by @Steve Babiak:
    @Sam Leon - check around for a plumbing outfit in your area that does drain re-lining. That basically would be done by sending a fabric tube into the pipe and then injecting an epoxy/resin that will cure in place. Might be just the cure for you in this little mess you have. Next link might find one for you:

    https://www.google.com/search?q=drain+reline+"fort+lauderdale"

    Steve,

    About six years ago I spoke to one of the early adaptors of an epoxy relining technology. I had a 2" drain that was leaking under a concrete slab and they came out, and I was lucky, the actual relining tech from the company they licensed the technology from was teaching a class for them so the whole crew came over to look at my situation as a "field study".

    What I learned from that exchange was that it was more for large size drains, 3" or up. 1.5" or even 2" is pushing it. They will insert a relining fabric but there are some limitations. The section to reline, between point A and point B, you must have access to. If in between point A and B there is a branched fitting, like a WYE or a TEE, the liner would span across and block that branch, and they have to come from the branch and cut a hole back through the main. The other problem is if the inside of the pipe is not nice and smooth, the liner would assume the shape of whatever it is...so if you have some tree roots that breached into the pipe, that liner would take the shape of the root it unfolds over. A kitchen drain is typical with lots of grease and slob, and one must swept the line clean with a jet in order for the epoxy liner to get a round smooth shape - and with my copper drain in that condition I am not sure it would survive a high pressure jetting.

    So anyways the epoxy liner rep at the time told me they couldn't fix my problem at the time, which was a PVC fitting that "pulled apart" but it was under the slab. I end up having to hire a service to dig a 27' long tunnel under my slab to get to the point of repair.

  • Pittsburgh, PA · Member since 2012 · 139 posts · 37 votes
    12y

    Very interesting and educational, thanks a lot for the posts @sam leon

Join the conversationCreate a free account to reply, vote on answers and follow this thread.