Marketing Your Property
Market News & Data
General Info
Real Estate Strategies

Landlording & Rental Properties
Real Estate Professionals
Financial, Tax, & Legal


Real Estate Classifieds
Reviews & Feedback
Updated over 15 years ago on . Most recent reply

Do it yourself "Yellow Letter" - A how to guide!
First off I'll start with my disclaimer:
This is MY version of a "Do it yourself" yellow letter. I know there are other ways to do it and companies that you can pay that will do it for you, blah, blah, blah. I'm not claiming this to be the best or the only way, etc. My goal is to describe as detailed as I can how I created my own letter and to show you how to do the same for yourself.
The reason I made my own was because I don't like the idea of doing things EXACTLY like everyone else...if we all did that then sellers nationwide would receive the exact same letter which to me makes no sense at all. Sellers that have already seen the letter your sending don’t want to see it again. Be creative and capture their attention. Whatever you do, don’t copy someone else word for word, if you do your letter has a good chance of going into the trash can with the rest of the junk mail.
Anyway, here is what I used to make my letter:
• The Print Shop 22
(this is a program that I use to make business cards, flyers, banners, t-shirt designs, logos, labels, etc.)
• Yellow note pad's with standard 8 1/2" x 11" lined paper
The other items are pretty obvious: Printer, ink, your mailing list, computer, envelopes, stamps, etc.
Before you open up the program to begin putting your letter together your going to want to do a google search for a hand written font, I use "Brian Scratch" but there are lots of others out there. Next, you'll want to put a letter together on a sheet of paper or on Word if you haven’t done so already.
Ok, onto the letter
1. Once you have The Print Shop loaded onto your PC you will open up to the "Project Picker" and select BLANK PAGES, then pick the "tall" setting which allows you to print on the 8 1/2" x 11" paper
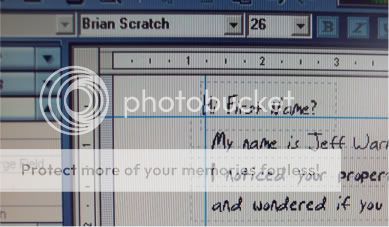
2. The next thing your going to do is to click on the left side of the page where it says "Text Tools", then click on "Insert Text Box". Resize the text box so that it takes up as much space as ONE line on a sheet of paper, change the font and text size at the top of the screen and start typing your letter.

3. The only way for this to work properly is to create a “Text Box†for EVERY sentence in your letter. Don’t worry about lining them up perfectly at this time, we’ll do that before we print it. See Image of “Text Boxesâ€

4. If you haven’t finished your letter, do that before moving on…just make sure that EVERY sentence is in it’s own “text box†so that we can move it up, down or side to side as needed. Be sure to SAVE your work every time you make a change so you don’t loose it if the power goes out.
5. Ok, now that your letter is all typed up your going to want to print a test page and see how far off you are from the lines. I usually print onto a blank sheet of paper then put a piece of the yellow paper over it, hold it up to the light and see how far off you are (no need to waste a yellow piece).
6. Before you start moving the “text boxes†where they need to go, click on the “Arrange†tab, then click “add guideâ€, then “vertical†. The idea here is to move the guide line into place where it can be used like the red margin line on the yellow paper. If you want, you can also add a horizontal line and put it where the first line of the yellow paper is suppose to be. See Image.
7. On to the fun part. Now that you know where your lines need to be, click on the first box with at the top of the page. Click the box ONE time so that it is selected. Now, with the ARROW keys, move the box up or down, side to side as needed. As you can see, the box moves in very small increments so lining everything up is pretty simple.
8. You’ll have to print at least a few pages before you get everything where it needs to be. If you’ve printed a few test pages and think everything looks good, put in a sheet of the yellow paper and print one last test page. If it looks good, save it and then you’ll be ready for the Mail Merge feature, which is also built into The Print Shop.
As you can see, this is not a perfect science because everyone should have their own letter. If you dig deep enough you’ll find old posts of mine where I was trying to find someone to answer this question…the end result was that nobody could answer me with a simple way to “do it myselfâ€, so I just made my own. The cool part is that once you’ve successfully put your letter together it will be easy to make changes to it and test different letters until you find which one works best for you.
The bottom line is that you need to get your phone to ring and direct mailing is a great way to do that. I hope this post is helpful. Feel free to post questions to anything that is not clearly laid out or hard to understand. I can make another post on how to use the Mail Merge function that is built into The Print Shop if anyone is interested, just let me know.
Thanks for reading and God Bless.
Jeff
