
DIY Plumbing for a Bathroom Remodel?
My wife and I bought our first house, as our primary residence, and have planned on doing much of the repair ourselves. First order of business has been the bathrooms in the house. Before we even moved in, I had to get the master bathroom shower working (the valve had become 'frozen' by mineral deposits from untreated well water -- neglect from the previous owner). The bathroom is 'operable'... but we still plan to do a major remodel of it later.
The second order of business is the 'guest bathroom'. The 'guest' bathroom is actually *larger* than the Master Bathroom at this point. It has a shower/bath, and *had* a wall-to-wall vanity. Our original (budget-conscious) plan was to just replace the flooring and bath (badly outdated), and move the vanity to open up a little more space (the 'bump' out right by the tub used to contain the water-heater for the house).

At this point, I've demo'd the bathroom, removed the tub/shower, taken out the wall that used to contain the 'water-heater closet', and taken most of the rest of the room down to the studs/subfloor. (copper piping you see was from original plumbing, which apparently had burst when the house was left vacant over a winter, and was later replaced with PEX).
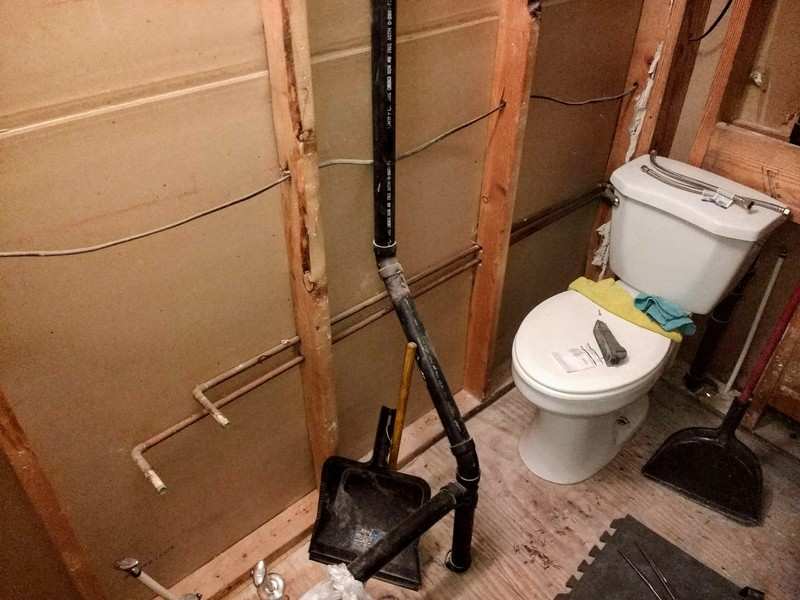

As you can probably tell -- this 'guest' bathroom is back-to-back with our master bathroom, and the 'wet-wall' between them contains the connection to the 'main stack' directly below their shared wall.
Our desire is to move that wall (and plumbing) 18 inches towards where the camera is, to allow a full bath/shower to fit in the master bathroom, and to make it a bit more roomy -- and to make the guest bathroom a little less awkwardly sized/proportioned, but still comfortable/cozy.
I've got no problems replacing subfloor or framing in walls -- but plumbing is somewhat new to me, and I'm hoping there's a middle-way between completely hiring this out, and potentially screwing it up by trying to come up with my own plan and potentially causing plumbing/drainage problems (here, you can pull your own permit if you are the home-owner occupant). I definitely want to make sure everything is up to code -- but also don't want to pay a mint to have this done, if I can reasonably contribute my own labor to it. (before we moved in, we had one plumber quote us a price of $900 to get a bathtub drain fixed -- something a friend of ours and I later DIY-ed for $80 in parts, and 30 minutes of labor.)
Are we crazy to think this is at least partially DIY-able? Is it unreasonable to ask a plumber to give us a 'consult' for a few hundred dollars to help guide us through making our own plans, pulling our own permit, and doing our own work?

Originally posted by @Alan Taylor:
Are we crazy to think this is at least partially DIY-able? Is it unreasonable to ask a plumber to give us a 'consult' for a few hundred dollars to help guide us through making our own plans, pulling our own permit, and doing our own work?
I don't think you're crazy to DIY this. Then again, I've never tried to DIY a job this big before. :) I am not a professional plumber.
Some considerations:
Are these the only two bathrooms you have in the house? If so, figure out a backup plan (like a room at the Super 8) before you dive in. Having to thrash to get it done so you can poop tonight, or so you can take a shower before work on Monday, just leads to frustration.
That black drain pipe is most likely ABS. It's possible to join ABS to PVC (the white stuff) but you don't get to use the solvent that sets instantly, and as I understand it, some jurisdictions don't allow it. Make sure you know where to get more ABS pipe, so you can join like to like. (Around me, Home Depot doesn't sell ABS pipe, but Lowe's does.) Also, make sure the ABS solvent is rated for exposing to water relatively quickly, like less than an hour.
To me, the big deal is that you'll have to offset the main soil stack - the largest black vertical pipe. What you have now is approximately this, from the side view:

and what you need to end up with is approximately this:

You need to have enough room, and access, in both the attic and the basement/crawl space to put those offsets in the soil stack. I have drawn both of the offset as sloped, because I know the one under the toilets needs to be. (First rule of plumbing: poop flows downhill.) I'm not sure if the one in the attic needs to be sloped or not; it may be OK to have it run horizontally. You also still need all the connections to the sinks and tubs that you have now.
You might be able to re-use some of the drain pipe you have now, but I would plan on installing all new pipe. The new wall or layout may be slightly different than what you have now, and the pipe isn't that expensive. If I was going to re-use anything, I'd re-use the existing vent pipes, because they normally don't have any water in them, and install new pipe for the drains.
Even after you demo the existing plumbing, don't toss any of it until you're all done. Sometimes using part of the old plumbing temporarily (like to cap off the new plumbing) saves you a trip to the store. (And then when you're all done, for sure, throw all the copper and brass in the corner of the garage and take it to the scrap yard later, or give it to a passing scrapper.)
Sometimes it helps to get some pipe caps so you can do part of the job. I don't know if you can get PEX caps, but for sure you can crimp a threaded fitting on to the end of the PEX and then just use a regular threaded pipe cap. For drain pipes, you can get giant rubber caps that fasten with a hose clamp. Up to a certain size, you can also get plugs that look like a rubber donut between two big washers; tightening a wing nut through the washers makes the donut squeeze out and seal to the inside of the drain pipe. The way this helps: if the soil stack has a double wye where both of the toilets connect, you put in the waste pipe (under the wye), the vent pipe (above the wye), and plumb one of the toilets to one side of the wye. You then cap off the other side of the wye with a cap. This allows you to poop at home tonight, and then finish installing the second toilet tomorrow. Similarly, on the PEX, you can put in the tees to serve both showers and both sinks, cap off one shower and sink, and concentrate on finishing the other shower and sink.
I don't think you're going to get a plumber to do part of the work for you. They can make more money by charging you for their labor. Also, they may not want to stand behind it if they don't do the work themselves.
I hope this helps!

I think @Matt R. pretty much explained it. I'll second the idea of having a plan B for a night. This may not be a one afternoon job if you've never done it before. And you don't want to rush it. I also doubt a plumber would assist. You may pay them to check out your plans and let you know if you're on the correct path. For instance, the slope of the horizontal drain should be somewhere like 1/4 inch per foot, not anything dramatic.
Also, it may be different where you're at, but some places will let the homeowner pull a permit, but may require a licensed plumber to do some of this. You could call and ask the city first. I'll add too that if you use PEX, get the metal connectors instead of the plastic.
Good luck with it.


- Handyman
- Pittsburgh, PA
I wouldn't DIY this. I wouldn't move the bathroom wall, either. I'm seeing four vents coming up, is this all right over the kitchen on the first floor and with laundry room in the basement? I think that no matter what you do, you're not going to get a quality solution here. The plumbing is just too dense. And then the sketch of the guest bathroom and the actual layout in the photo doesn't match up. This just looks like a lot of heartache waiting for you.

- Rental Property Investor
- East Wenatchee, WA
- 15,938
- Votes |
- 10,173
- Posts
- Rental Property Investor
- East Wenatchee, WA
I 3rd the no DIY any further vote.
You were smart to demo and expose everything. You're smart to finish it out. Let professionals complete the in-wall, drain and stack work.
You've done your duty and are accepted into our hardcore, strong-knit DIY group here on BP if you'd like to be a member 👍 Other members like Jim, Joe, JD, Mindy, Brian and myself come to mind.
A wise DIYer knows their limits. Funny, I used to know everything. Now I know when I run into something I don't know. I would hire a pro and be there to observe and learn for next time.
Originally posted by @Matt R.:
I don't think you're crazy to DIY this. Then again, I've never tried to DIY a job this big before. :) I am not a professional plumber.
Some considerations:
Are these the only two bathrooms you have in the house?
Thanks Matt! That was very helpful! In this case, we do have one *half* bath (currently not fully operational -- toilet flange needs to be replaced) that we could use, if need be -- if we would definitely have that up and working before we embarked on this big of a change to the plumbing. Don't want to end up with "nothing to go on"!
In hopes that this provides some clarification -- we're hoping to do a move like this Sketchup file illustrates:
Going from this:

Changing to something like this:

These two bathrooms are on the upper floor -- the kitchen is through the wall on the 'bathtub/shower side' of these two bathrooms -- and from what we can tell, has separate drain plumbing for the sink and dishwasher.
Downstairs the plumbing in the ceiling looks a bit like this:

So, Mark was perceptive to propose 'angling out' from the main soil stack - in this case we'd be cutting it close to impeding some of the headroom in a passage way between different rooms in the basement. Since this is new territory for us, we're trying to make sure we think this through as much as possible before we dive in!
We're having a professional plumber come by (he's done other work for us at this house) to estimate/bid this project, just to give us an idea of how much it would cost.
Once this plumbing is re-arranged satisfactorily, we can absolutely take the bathroom the rest of the way to a polished finish!

I commend you for tackling this job. Bathrooms are tricky, especially layouts in such a small space. Ive been through the frustration, it is not fun. And after many failed attempts tackling my first bathroom myself, I ended up hiring a professional to do the plumbing, and spent more money had I just subbed it out to begin with.
IMO, you are creating a lot of work for yourself, for a minimal space addition and a smaller vanity. I know its exciting fixing up your first home, but looking back I would have done things a lot differently with mine... Chances are you will be renting this out in a year. I say slap some new tile in there, keep the closet and add shelves for linens, paint, trim, tile around the tub, and call it a day. The end result will look just as nice.
@Alan Taylor Let me lay this idea on you: how about just moving the part of the wall between the two tubs? Essentially, slide the guest tub towards the door wall, into the space that used to be the water heater closet; build a new wall at the control end of the guest tub; build a new wall from that wall back to the original wall; install a bigger tub or shower pan in the master bath.
The advantage here is that you only have to move the two ABS vents that are currently in that wall, and the PEX supply lines. The main stack stays right where it is. The new short wall in the guest bath (the one that's at a right angle to the back wall) would be a great place for a towel bar, or a couple of small shelves with towels on them, or maybe a little cabinet for the towels.
The disadvantage is that if you don't move the main stack, I'm not sure if moving the guest toilet to the outside wall will work - since the stack is in the same spot, you have to make sure you'll still have enough slope on the pipe to the toilet, even with the toilet being further away from the main stack. You'll have to do a little more tile work in the master bath; you'll have walls on (part of) three sides of the shower, instead of two. Depending on where the light fixture(s) are in the master bath, the "enclosed" space at the control end of the master bath might be a little dark; a waterproof ceiling fixture over the master bath fixes this.
Another comment, based on the new photo from the basement, looking up: if you move the guest toilet to the outside wall, you either have to run the new toilet drain underneath the joists, or cut at least one of the joists. It also looks like that HVAC duct at the top of the picture might be in the way of where you would want the toilet flange to go.
Also, regardless of whether you move the wall or not: since you have at least the wall in the guest bath open, prep it for grab bars before you close it back up. Please look up the exact spec on this, but essentially you need to install a 2x6, vertically, on the studs at about waist height, the entire length of the tub. I think you might have to add some wood to the control wall as well. If you want to install a grab bar later, the extra wood means you can just screw it in wherever, and not have to hunt for the studs.
@Jim K. In the photos in first post, he's already removed the toilet and set it back down on the floor, a couple of feet to the left of where it originally was. If the toilet was still installed, it'd match the 3D sketch. (That took me a minute of looking to figure it out, too.)
@Charles Goetz I exaggerated the slope of the drain pipes in my drawing on purpose. Most of the DIY plumbing books I've seen do this too. I think the idea is to remind people that there has to be some slope on the drains - as opposed to the supply lines, which usually get run on the level if they're horizontal.
edit: added note on grab bar prep
- Handyman
- Pittsburgh, PA
OK, yes, I see the flange on the floor now, thank you, Matt. Should have spotted it before and figured it out.
Moving part of the wall, as Matt suggests, is more workable, but still the kind of headache that I would not go through, not because I don't have the technical skill and experience to do it, but because I wouldn't see the long-term benefit of going through with it. But if you do, well, that floor register and the duct leading to it would probably be OK on the partial wall move, but what are those two vents, the ones you have to move, that are coming up from the floor? What are they connected to?
Your original plan of moving the toilet up on the other side of the wall on one side to make it cross a joist to get to the stack...Alan, if you try this, tapping a 3 1/2 in. hole in what I think is just a 2x8 joist to get the plumbing through, or doing some kind of wild drop arrangement below to get it past that joist, that's really not going to work out well long-term.
I would LOVE to hear the bid you get from the plumber to do this, though.
I would also like to add emphasis to something about DIY that @Steve Vaughan pointed out, with its many echoes from my teaching days. I would agree that the smart thing to do would be to give it up now, and let others handle most of the new finish work. We're talking a lot of new skills and tools in one project to acquire to get your bathroom back. You would probably gain much more by paying someone else to do it and watching them go through the process, preparing yourself for your next bathroom remodel, and the next one after that. Set a reachable goal now -- maybe just install the new tub. Let the rest go today. Grow stronger for the next remodel. And the next one.
We went ahead with moving the wall -- in a two-phase process.
We ended up taking the room down to the studs and joists -- replaced the sub-floor and re-framed in a new back wall, and then re-framed in an area for the tub/shower, and had a plumber come in to re-arrange the plumbing/water-supply (this was the biggest headache), and the air-ducts.
We are just getting to the point where we are tiling the shower and floor -- and as soon as this bathroom is operational, we'll probably immediately demolish the master suite, and push forward on the second part of the endeavor.
The biggest thing we have learned, thus far, is the ins and outs of the permitting/inspection process here in this county.
The first inspector we had was... unpleasant. Dinged our plumber for several things -- and the plumber took some of it personal, and wanted to be there in person for the next inspection. Heckuva thing to be in the middle of, as the home-owner and the person who pulled the permit. Definitely one of the things we'll be adding to the interview process for hiring any other professionals: "How would you describe your interactions with code inspectors? How do you respond when they fail some of the work that you performed?"